Wednesday, March 28, 2012

Sun, Waves and Sand - a scrapbook layout


I've always loveeeeee the sea. I've taken quite a lot of photos of the sea when I used to be very active in scuba-diving. Oh well, I can talk forever about scuba-dive, but don't let me bore you.

So, today, I'm sharing with you a layout of Sun, Waves and Sand and this was posted on Papier's blog last week. The stickers that I have used here (surf board, summer and the smiling sun) all came with my DT kit for this month. Aren't they cute?

For the background, I have combined Martha Stewart paint and its white texture effect to create the sea water on bottom half of the card stock. Maybe you'll do a better job at that than I did...haha! I have also added a white gauze as a net and fish & a clam die-cuts from Pink Paislee.

Apothecary bottle and actually! I have also added few small shells on the final version of this layout. I hope they are still intact on the layout...theee...hehehe...

Can you see the tall stacking ice creams? Perfect combo for a nice relaxing day on the beach, eh?

Materials used:

Card stock: from DT kit , available at Papier

Paints and white texture effect: Martha Stewart

Fish and clam! Ice creams, umbrella and sentiment die cuts: Pink Paislee

Chipboard stickers: DT kit

Apothecary bottle: local art shop

Gauze: left over at home

Sea shells ( that you can't see here) : own sea shells collections

Thanks for stopping by!

Nida


Friday, March 23, 2012

All the Best Moments - a scrapbook layout


Hi there! It's Friday at last! . Had a tough week at work. Too many meetings, too many issues, and pressed for time. I have been traveling back and forth to Putrajaya on an assignment and it has really taken a toll on me. Plus with the heavy rain and traffic jams. Don't you just love KL!! Theee...hehe heeee....

A layout I did weeks ago and don't think I have uploaded this before. I have used white texture effect from Martha Stewart on a sequin waste here. Quite simple.

I did a faux stitching too. Can you tell? Hehehe....

Materials used:

Card stock: Bazzil Basics

Pp: Webster's Pages

Shabby chic frame: Melissa Frances

Brads: My Minds Eye

Fabric tag: Webster's Page

Sparklers: Webster's Pages

Chipboard stickers: My Minds Eye

Pen nibs by Tim Holtz Ideology

Flowers: Prima

Vintage trinket: Prima

Laced butterfly: Webster's Pages

Swirled crystals / pearls: Prima

Texture paste: Martha Stewart

Faux stitching: with Hero Arts stamp.

Thanks for stopping by folks! Ciao!


Wednesday, March 14, 2012

Altered Frame for Wednesday at Papier

Hi there! I would like to share with you an altered frame project, which I did for Papier this week. I bought this frame at Daiso and it's only RM5! Haha..

The patterned papers that I have used here are from my DT kit. Most of the items I have used here are also available at Papier.

Firstly, I have painted the frame with Martha Stewart paint combined with the white texture effect, which is why you can see the roughness of the surface. I like that! Then, once dried, I have applied Ranger ice stickles onto the frame, which is giving it the glittery effect. Of course, you can also use one of Martha Stewart glitter paints if you wish. Just keep your imaginations run wild! Hehe...

Materials used:

Frame: Daiso

Pp: Webster's Pages

Chippie: Dusty Attic

Embossing on chippie: Shimmerz Enamelz

Paints and white texture: Martha Stewart

Glitter: Ranger Ice Stickles

Flowers: Kaisercraft

Alpha stickers: Webster's Pages ( from Sunday Picnic collection )

TFR&L! Ciao!


Sunday, March 11, 2012

Silly - a scrapbook layout


Hi there! A new layout from me using the Sunday Picnic by Webster's Pages and together with die-cuts from Kaisercraft. And of course, can't miss Tim Holtz there...ehehe...

This is one of my favourite photo; him making that funny face and that steam puffing just at the exact moment ! Lol!

In total, I think this took me about an hour to complete.

A very simple layout ;)))

Materials:

Pp: Webster's Pages Sunday Picnic and .... emm...was it 7gypsies?

Die-cuts: Kaisercraft

Journalling tickets: Tim Holtz Ideology

Stickers: ( got this from MPH bookstore..)

Button chipboard stickers: My Mind's Eye

TFR&L! Ciao!


Wednesday, March 7, 2012

Vintage Altered Book - with simple tutorial for Papier


Hi! I have always love books! Sometime, I would just walk in a book store and immersed myself with the sweet musky smell of books. Yes! I love the smell of books. Old books and that musty ink scent sure is the best, but the new ones and those 'fresh from the oven' smell is superb too!

So, in a way to celebrate my love on books ( hehehe ) for this week at Papier, I am sharing a vintage altered book with you. Further below is a simple and short tutorial. If you like the 'vintage'-look and don't mind getting your hands dirty, then head on to your crafting room and start on with this altered book project.

The tutorial:

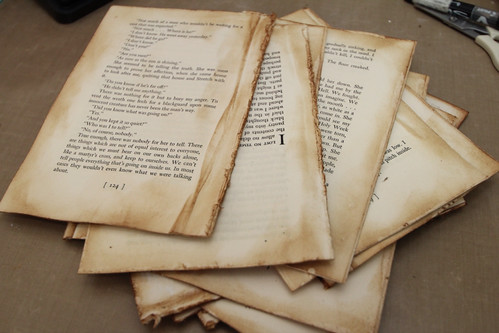
Well, what I have used here is basically an old hard cover book, which I purchased from a local flea market. I bought this for RM5. Not bad. You will need to rip-off all those pages out from its cover.

Glue together at least 5 or 6 pages. This really depends on your needs.

This was how raw it looked before I started to work on it (below). The edges have been partly distressed with Ranger ink. I have used Vintage Photo here.

Next, create. You can start with distressing the edges of each glued pages.
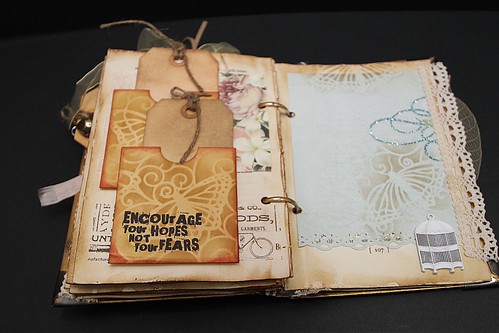
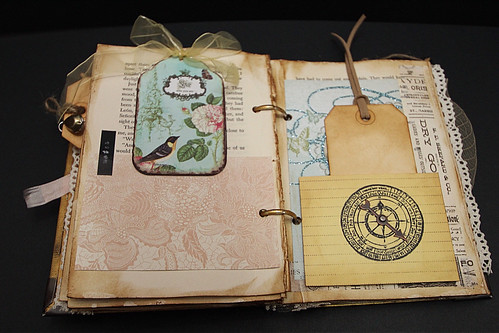
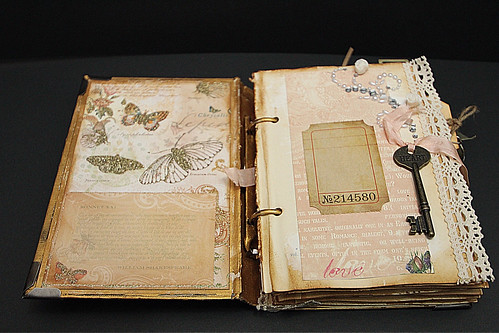
You can use scraps from your stash to create a journalling tag or use naked pockets with tags, and paste it onto these pages, like the one below.

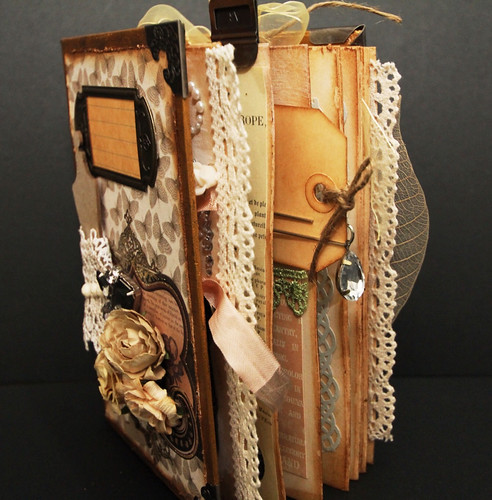
Don't forget to punch onto these pages and use Tim Holtz ring binder to secure these pages together. This ring binder is then secured to the spine of the book with brads; refer below. You can get this ring binder at Papier ;)))

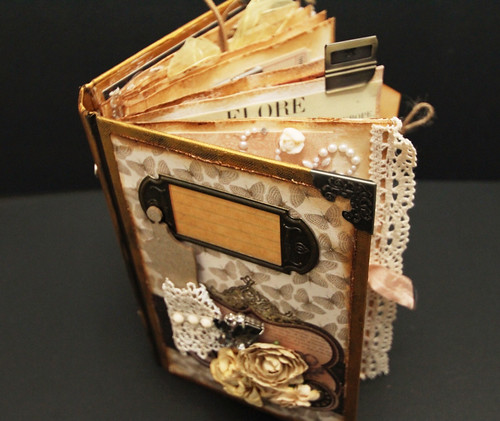
You can see above how I have applied Inka Gold by Viva Decor to the edges of the book cover. I have also applied the same to the ring binder so that it matches perfectly to the whole scheme.

Well, I guess the rest is embellish the altered book as you wish. You can use laces to define the edge of each pages or even ribbons to tie around the ring binder.
If you want to view more of the pages, do stop by at Papier.
Below are the items that I've used in this altered book of mine for this week.

(I wanted to upload the back cover of the book as well here, but for some reason, when I took these photos, I have somehow forgotten about it! Lol! I'll try to upload later. ;))

Materials used:
Pp: Webster's Pages (Western Romance) and My Mind's Eye - from DT kit. Also used is DCWV.
Punches: Martha Stewart
Journalling tickets: Tim Holtz Ideology
Pen Nibs: Tim Holtz Ideology
Metal key: Tim Holtz Ideology
Game spinner: Tim Holtz Ideology
Tissue tape: Tim Holtz Ideology
Metal corners: Tim Holtz Ideology
Metal frame(front cover): American Crafts
Metal birdcage: Prima
Lace: DT kit ( edge of pages )
Lace on dress form chippie: Webster's Pages ( I think! Hehe )
Dress form chippie: Dusty Attic
Vintage trinkets: Prima
Gems (on cover): Parisian Anthology House of Three by Pink Paislee
Crystals: Prima
Swirling rhinestones w resin flower: DT kit
Stamp: Tim Holtz and Hero Arts
Stencil: The Crafter Workshop ( TCW )
Distress ink: Ranger
Seam binding ribbon: from a scrapper friend
Metal embellishment with bird: local shop, can't remember the name..hmm..
and Inka Gold by Viva Decor for the cover

Most of the manufacturer items listed above are available at Papier. Even if it is no longer on display, you can come in to the store and place an order ;)))

So, I do hope this altered book will be an inspiration for your next crafting project!

Nida


Saturday, March 3, 2012

ATCs - Metal Galore series


Hi there! These are few of my ATCs from the 'Metal Galore' series. I have used a metal sheet/paper, which I bought from Scrappingville in Bangsar. I ran the metal sheet sandwiched in between the Tim Holtz Alteration embossing folder with my ole' loyal Cuttlebug. Poor thing! I really need to change the plates already...haha..!

Well, then, I have applied several colours of alcohol inks by Ranger onto the clear part side of the metal sheet. I have also mixed in some mixatives and the blending solution to get different effects. On the coloured side of the metal sheet; I have applied the metallic mixatives directly onto it and others were first sanded before I applied the alcohol inks.

Loveeee playing with these inkssss.. and metals!

TFR&L! Ciao!


Friday, March 2, 2012

Enchanting - a scrapbook layout


Hi there! I am about to enjoy a delicious waffle with a cafe latte now but! before that; here's a not so new scrapbook layout I want to share and this was done late last year. I have used the huge mask from Tim Holtz, chipboard sticker from Prima, die-cuts from Pink Paislee, burlap, grungeboard/paper diecuts from Tim Holtz and few dried leaves.

That's all. Quick and simple!

And now, for my delicious waffle....yumm yumm....

TFR&L!


LinkWithin

Related Posts Plugin for WordPress, Blogger...