Sunday, May 29, 2011

I am here for you anytime @CardNation


OK, I did 2 cards today and here is no. 2 - I am here for you anytime!

For this card, I have used:
Stamps: HeroArts Cuckoo
Pearls: Queen and Company
Water-colours: Faber-Castell

TFR&L! Ciao!

Live in the Moment @ CardNation


Hi there! A new card from me this weekend - Live In the Moment.
I have used stamping and cutting for the flowers.


Quite an easy card to make and looks clean too. Don't ya' think so?

For this card, I have used:
Stamp: HeroArts
Papers: Bazzil Basics for the orange flowers.
Pearls: Queen and Company.


TFR&L! Ciao!

Saturday, May 28, 2011

My Little Dino - A Scrapbook LO


Hi there! Good weekend so far? It's already evening of Saturday now and I kinda feel so exhausted after attending a birthday party and later shopped for my crafty stuffs at The Curve and Sg Long! Amazingly....Mr Hubby was so cooperative today! and he just gave me 'that' look when I told him how much I have spent today..LOL!


Anyway, this scrapbook LO is quick and pretty easy to make. It involved tearing, a bit of painting, stamping and water-colouring.


We had a Dinosaur birthday party in 2010. My son was so enchanted with these dinosaurs so I figured, why not have a Dino Party! That costume and most of the decorations were purchased through eBay and he really loved it!

I have enjoyed myself creating this layout too..
 

 For this layout, I have used:Flowers: Prima
Twine: HeroArts
Paper: My Mind's Eye and Kaisercraft
Embellishments: Momoyo

TFR&L! Ciao!

Thursday, May 26, 2011

You Mean So Much To Me @ CardNation


Hi there. Err.. yeap, this is a simple card from me today using the left-over scraps from trying out my ecraft and also cut-outs from previous work.

 I have used HeroArts for stamping the message. It's a cling stamp on Great Flourishes Messages. I think it's a great stamp.

I have not used buttons much on my designs, simply because I think my buttons are a lil' bit on the boring side. I need to shop more buttons....sigh! (baru dapat gaji dah nak spend lagi!! hehehe).


For this card, I have used:
Papers: My Mind's Eye, Bazzil Basics
Rhinestones: Kaisercraft
Button: SazzyNSuch

 TFR&L! Ciao!

Happy Times! - A Scrapbook LO


Hi there folks! Presenting my new scrapbook layout, Happy Times!. Takes a while to complete especially when hand-stitching is involved. I've mentioned before in my previous post that I own (actually it belongs to my Mom!) a sewing machine (not sure what brand it is) but since it looks so daunting but frightening; I just feel the need to wait for a little while.  

I've included stamping onto this layout and they are my first collection of Prima Stamps; and they're quite cheap too! I was quite surprised and quickly grab it from the store. LOL! 


Well, main cardstock is of course Bazzil Basics. Very thick and sturdy. And the rest of the papers are mixed with My Mind's Eye.

Flowers are a mixture of Prima's, Kaisercraft's and HeroArts. Some of the loose petals were coordinated with brads by Basic Grey. They have nice brads.


Oh yes and one of my favourite piece is of course chipboards by Dusty Attic. I have used it raw. Can't wait for the next project using Dusty Attic's materials again.

OK, things I have used for this layout:
Stamps: Prima Stamps
Papers: Bazzil Basics, My Mind's Eye
Flowers: Prima, HeroArts & Kaisercraft
Brads: Basic Grey
Chipboard: Dusty Attic
Thread for stitching: Bazzil Basics

TFR&L! Ciao!

Wednesday, May 25, 2011

Have A Tweet Day @ CardNation


Hi there! Here are few photos of my latest card invention. This involves stamping, cutting and water-colouring. I got these stamps for free from Pink Petticoat through Simply Cards and Papercraft magazine last week. I don't think I did much of good job on the colouring though. I bet my son colours better than me! LOL! Well, we'll get him to colour next time and he loves rainbow of colours!

This is the inner side of the card and I have actually covered the piece with a green construction paper and simply include a framing for the wish. I did that through my ecraft! Simply amazing!


For this card, I have used:
Stamps: Pink Petticoat
Water-colours: Faber Castell
Frame: Bazzil Basics by using ecraft

TFR&L!
Ciao!

Monday, May 23, 2011

Tearing problem solved!


Hi there! Just would like to show you the results from cutting an intricate shape from my ecraft. You can see clearly the tearing around the four corners of the cardstock. This is Bazzil Basics cardstock and it's quite thick. I have visited a few websites to get some help and the one that helped me the most was Denise's at PurplePaperParadise.com. I have tried all possible settings for this intricate shape but it was fruitless. Finally, I have included a stabiliser (another similar cardstock) and voila! the tree was cut 98% perfectly. The 2% is only on the smaller branches which tend to curl up. Hey, but that's OK.. this is intricate shape at the smallest size we are talking about! You can see from the picture above the tree which was successfully cut in the middle of the cardstock.

For those of you who owns an ecraft and want to try cutting using this method; you would notice that the blue light at the blade and pen trolley would not appear as it is not cutting through the stabiliser. What I get was just indentation but that's OK, you can still use the stabiliser over and over again; as long as your pressure settings are correct, of course! You would know when your pressure settings are not correct when you are cutting the stabiliser as well or you are not cutting the cardstock at all! Really quite simple!

I didn't have a hard time figuring out how to use the machine since it's very simple and pretty straightforward too. But, of course, successfully cutting shapes and what I mean is intricate shapes; you need to go thorugh the learning curve. And! you need to sacrifice a lot of papers LOL! So, be aware of that ..and be mentally prepared!

Oh and another thing, it is equally important that you understand the paper that you will be cutting as well! Cutting by the grain or across really makes a difference. This was highlighted in PurplePaperParadise.com and also Tom Meeks at Create & Cut. Check it out!
My ecraft came without the blade housing and according to Denise at PurplePaperParadise.com; it makes a lot of difference if you cut with or without. Luckily, Craftwell USA is happy enough to send me one for no charge at all. Thanks Craftwell!

My next challenge will be cutting from the PC instead of from the SD-card. I have not tried that yet but I do hope it will turn out smoothly....

TFR&L!

Ciao!


Tuesday, May 17, 2011

Happy Birthday Apeen! - @CardNation


 Hi! I just completed this card a couple of hours ago. Since Mr Hubby was busy with the barbeque, I had to intermittently work on this. But, fhew, I got this complete within a day! 

For this card, I have used HeroArts Birthday Gift and Playful Alphas stamp. For colouring, well, I have used watercolour pencils for all, except for the tiny banners, which was actually a HeroArts craft paper.

 I have also used Martha Stewart Punch Around Page - Ribbon Loop for the 'wish-tag' inside. (do you call it a wish tag or what?).

A little cute love-shaped stickers to hide the hole I have made by using the 2 brads. Well, you can't see it here.. hehe!

For this card, I have used:
Stamps: HeroArts - Birthday Gifts and Playful Alphas
Martha Stewart Punch Around the Page - Ribbon Loop

TFL! Ciao!

It's Time to Celebrate - @CardNation


Hi! This is a 'quite super-quick' card to complete. Well, cutting the clocks was not so easy and I had it stamped onto a foam paper. I love the HeroArts craft paper (yellow with swirl dots!) and it looks alright with the green clocks..

I just had to add that glittered ribbon...i dunno why..

For this card, I have used:
Stamp: HeroArts - Time to Stamp
Paper: HeroArts
Handwriting: My Own

TFL! Ciao!

Monday, May 16, 2011

Sydney 2009 - A Scrapbook LO


This layout was done quite some time ago but never had time to publish. This is without a doubt a travel layout. As you can see, I have added boarding tags just to add a lil' bit of extra to the layout.

Cut-outs travel wordings are from Karen Foster Design. and the numbered chipboards are from local bookstore that sells craft stuffs as well in Bangsar. I have applied distress inks onto it and later the crystal lacquer just to give a 3D finish.

Other than that, well it's just a simple layout and pretty quick to complete.

For this layout, I have used:
Cardstock: Bazzil Basics
Cut-outs travel wordings: KAren Foster Designs
Distressing: Distress In by Tim Holtz
Stamp: Kaisercraft

TFL! Ciao!

Sunday, May 15, 2011

Underground at Picadilly Circus - A Scrapbook LO


Hi there again! Presenting my latest LO entitled "Underground at Picadilly Circus". I need to use flowers and girly designs so I have used a photo taken way back in the 90's when I was studying in the UK. Here we have my aunt and 2 cousins, waiting for the next train to Southall. I can't remember where exactly we were heading but we definitely stayed in Southall.

I have used Prima Mask and applied distress ink by Tim Holtz. After that, and this was the tedious one; I have used my craft knife to cut the shapes within the vines / flourish and later added Kaisercraft cardstock (green with designs) at the back.

Martha Stewart's ribbon loop was then punched around the edges of the cardstock. I simply love this!. There's quite a negative space on this LO and I have sprayed Tattered Angels Glimmer Mist. 

Flowers are by a mixture of Prima and HeroArts and brads to coordinate the petals together. 

I have used my own handwriting for the journalling.
Oh! And guess what!! No stamping this time!!! 

For this LO, I have used:
Cardstock: Bazzil Basics and Kaisercraft
Flowers: Prima and HeroArts
Sprays: Glimmer Mist by Tattered Angels
Inks: Distress Ink by Tim Holtz
Edge & Corner punch: Martha Stewart - Ribbon Loop

TFL! Ciao!

Thursday, May 12, 2011

Things That Make Me Happy - A Scrapbook LO


Hello peeps! Presenting a new scrapbook layout "Things That Make Me Happy". 
I have done quite a number of techniques here and they are; stamping, spraying / misting, distressing, heat-embossing, fussy-cuts, quilling, stitching, embossing and painting. Fhew! 

I've tried to make this layout appeared 3D by using a birdcage chipboard by Kaisercraft, added some loose quilled circles, fussy-cuts the embossed flourishes. This is the first time I added quilled techniques to my scrapbook layout; and it's just a a couple of simple loose circles.


The beautiful tassle is from Jolee's Boutique, which I simply fell in love with the first time I saw it at Scrapbook Memories. They are about RM8++ each and came in 3s. That leather string / twine is from one of the souvenir shop in Jaya Jusco and it's about RM3 per metre.

The parentheses chipboard was first sprayed with Glimmer Mist (Tattered Angels) and later left to dry before adding on a layer of Crackled Paint. I love the results. 

And the bird cage as you can see on your right, is from Kaisercraft and I've actually applied VersaMark and later sprinklered with embossing powder before finally heat-embossed it. It gives out a shimmering copper tone and I simply love it! It looks so vintage.

For the vines / flourishes around the photo, well that's obviously the tedious fussy cuts lah! You can't see clearly here on the photo, but these flourishes were first embossed with dotted circles by Cuttlebug. I have distressed it with Tim Holt's vintage photo just clear enough to see the embossed patterns. 

Oh yes, and not to forget the stitching on the bird cage! That was hand-stitched and half way through the stitching, honestly, I think I should be considering a real sewing machine...for crafting. I have a big electronic Japanese made "whatsoever" brand but I haven't got myself around to use it. It looks so daunting. 

Last but not least, pretty Prima flowers.

 For this layout, I have used:
Cardstock: Bazzil Basics
Chipboard: Kaisercraft
Flowers: Prima
Tassle: Jolee's Boutique
Rhinestones: Momoyo
Inkpads: Distress Ink by Tim Holtz
Crackled Paint: Ranger
Stamps: HeroArts and Kaisercraft

TFL! Ciao!


Friday, May 6, 2011

Itchy Hands!

Yess...I can't wait to scrap today. My hands are all itchy and just waiting to hold the glue, scissors, stamps, spray mist, inks, papers...ughhhh.... There are a lot of inspirational ideas on the web that just sizzles my creativity even more! I have ideas all jumbled up and if I don't sketch it, I'm just afraid I would lose it.

Tomorrow is going to be a busy day for me, so scrapbooking will have to be later at night (huk!huk!).
I'm very pleased now that I have an extra long table (just purchased from Ikea) for all my creative stuffs. Thanks to Mr Hubby who was ever so patiently waited for me to choose just the right table. He even gave a few comments. But, his patience was running thin when I took more than necessary time to decide. Noticing his restlessness, I quickly decided and off we went. LOL! Luckily, it was the right decision and I am very happy with my scrapping table. I get to placed my printer, laptop, eCraft, a very wide self-healing pad (whatever you call this?!), a stack of embellishments in Samla containers and etc etc.

Wednesday, May 4, 2011

Happy Teacher's Day


Hola! Emm...introducing a not so super quick card especially made for Faiz's class teacher, Teacher Aina. Very simple and straightforward. I dug out some unused materials my Mom used for my wedding years back. Again, I have used one of my personal favourite HeroAts stamp; the Bird Greetings. Can't help it lah.... 

Flowers are by Kaisercraft and HeroArts coordinated with brads from Momoyo. For the vase, I have actually embossed it with my Cuttlebug and later punch with doily lace by Martha Stewart. For the final touch, I have added crystal lacquer on the brads as well as on the embossed dots!

Happy Teacher's Day!!

Ciao!

For this card, I have used:
Stamps: HeroArts LP121 Bird Greetings, LL763 Playful Alpha
Flowers: Kaisercraft, HeroArts
Brads: Momoyo
Colouring: 3D Opaque Inks Souffle by Sakura of America
Punches: Doily Lace by Martha Stewart
Embossing Dots: Cuttlebug

Distress effect

Hi again! And another photo, which I have taken at site that reminds me of the technique in scrapbooking.

Looks like a misting / distressing effect huh? LOL! Not sure what's causing this but I suspected must be from one of the spray paint works...I think!

Ok gotta get back to work now!

Ciao!


Sent from my iPhone

Crackling paint effect

Hi there! I was at a construction site today somewhere in KL. I couldn't help myself from taking this interesting photo of a wall, which has some crackling effect on it. Unlike scrapbooking, you would purposely want to create this great effect. I personally like it myself but in the line of construction, this is not good! LOL!

Today I have found a few inspirational ideas at the construction site. Can't help myself thinking of my scrap works while making my rounds hehehe...

Monday, May 2, 2011

A Little Birdie told me...... CardNation!


Hi again! This week is the final for our tax submission. And I completed it on time!! , err..which was like 4 hours before the final bell! No excuse this time for procrastination but thanks to hubby who has been persistently reminding me of the obligation!

OK! Here's a card for every occasion. I have used Bird Cage stamp from HeroArts (yes! let me tell ya' that I'm a CrazeeStamper!!) and stamped on a green foam paper. Fussy cut, of course and glued on the card. I have also used Bird Greetings stamp by (what else!) HeroArts and still, this is one of my personal favourite. LOL!


I have ALSO used Flower Branch stamp by HeroArts on top of the card and applied a string to tie the bird cage to the branch.

I have water-coloured the flowers and the leaves on the branch and honestly, I kinda enjoy this technique!

For this card, I have used:
Stamps: HeroArts - Bird cage, Bird Greetings and Flower Branch
Inkpads: Memories - Black
Embellish/Embossing pen: Souffle by Sakura of America


Ciao!

Love of My Life - A Scrapbook LO

 Hi there! Presenting my new scrapbook creation entitled "Love of My Life". Fheww...I just can't believe it that I managed to complete this in approximately 3 hours ( times of interruption not counted, of course!). I've been having this LO idea for quite some time. I knew that I should be using lotsa flourishes, flowers and of course misting and distressing!


Firstly, I have sprayed on Glimmer Mist by Tattered Angels (Meadow Green) onto the 12" x 12" Bazzil Basics Cardstock. Then I have applied distress ink by Tim Holtz onto the edges of the cardstock. 


I have cut a strip of Webster cardstock and punched using EKSuccess edge punch (open scallop) on one side. This was glued onto the red Bazzil's and later the photo. I have stamped fancy flourishes by Kaisercraft all around the photo to create a livelier effect.
 

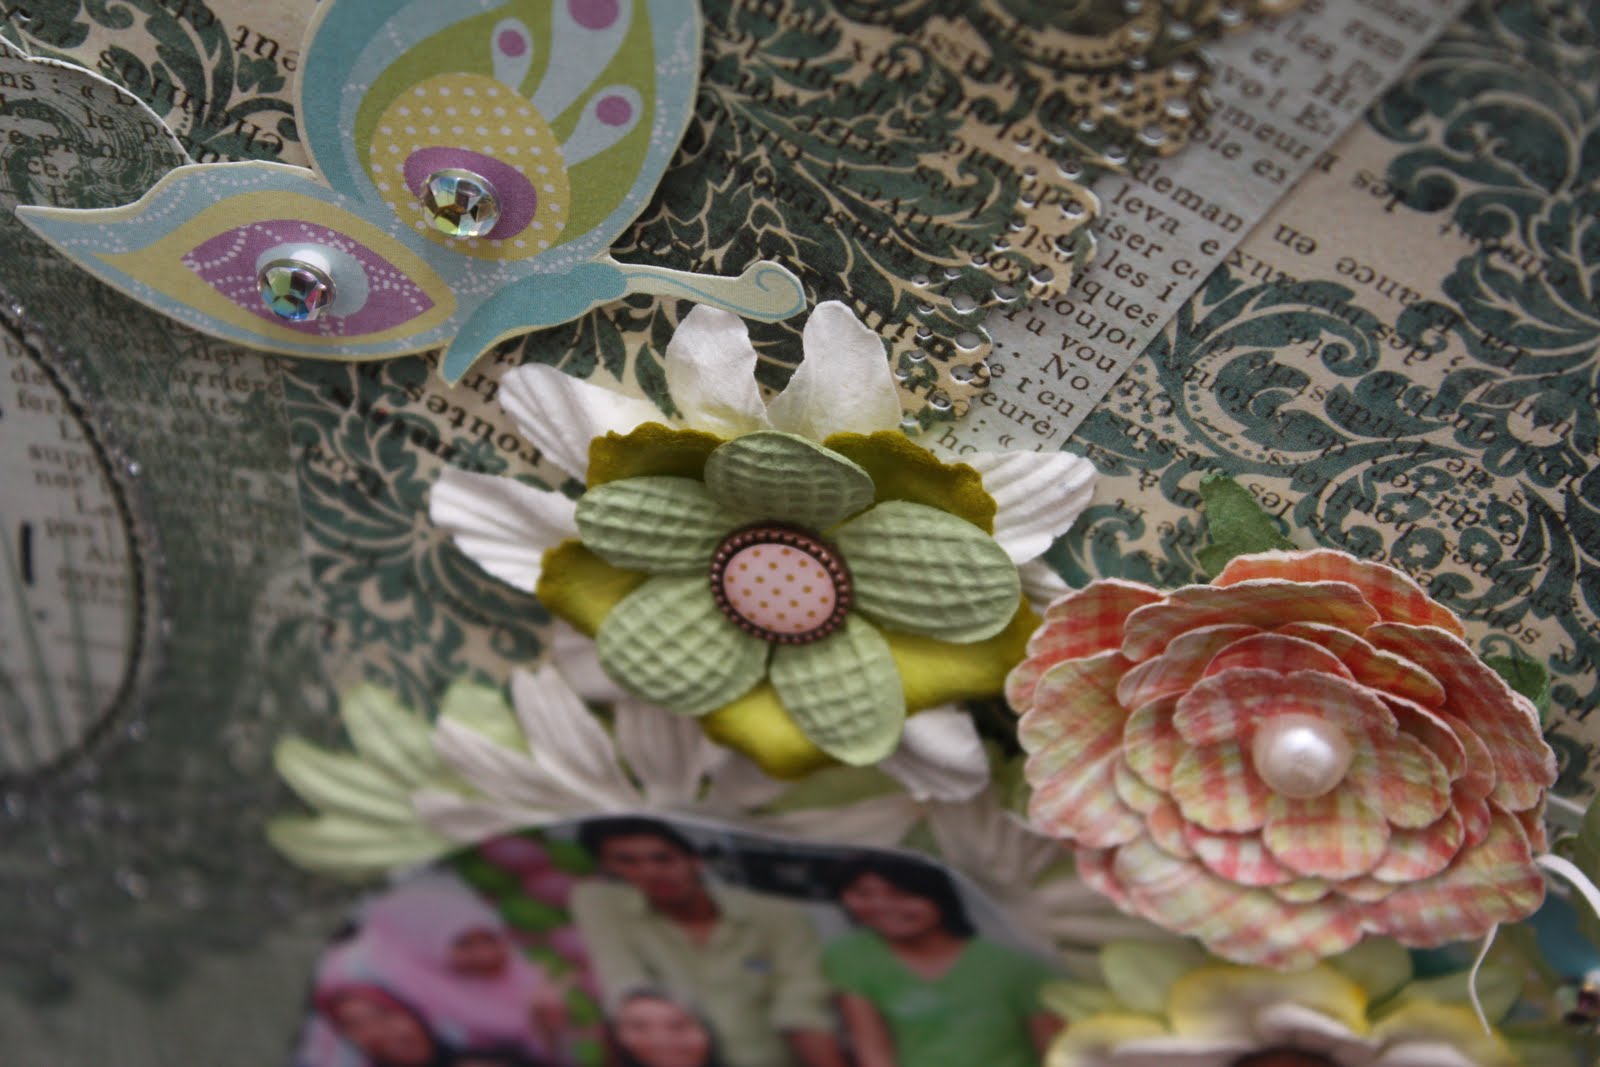
I have also used HeroArts (Designer Butterflies) right at the bottom and added pearl to the butterfly.

The Prima flowers were originally white but I have sprayed on the Glimmer Mist (Meadow Green and Golden Terracotta) onto it and you can see the results. Never realised it's gonna be so pretty!  Pretty Prima flowers! I have used brads of course to coordinate the bigger and smaller petals together, stick them onto the layout before finishing it off with cute buttons and pearls.


I have smeared on the left over glimmer mist from the craft sheet onto a tag and once dried; punched the edge with Martha Stewart's. See, I don't waste a thing here! Maximise! LOL!

And lastly, I have added rhinestones by Kaisercarft onto the fancy flourishes. That bling thing!


Here you can see a close-up of the pretty Prima flowers, which was sprayed with Glimmer Mist (Meadow Green and Golden Terracotta) by Tattered Angels.


Add buttons and pearls to taste!


And here's the tag! I didn't want to waste the glimmer mist left-over on the craft sheet. So, here's the result. Just lurve the edge punch by Martha Stewart...so sweet ..

For this LO, I have used:
Cardstock: 12" x 12" Bazzil Basics, Webster
Edge punch: Martha Stewart
Stamps: Kaisercraft (Fancy Flourishes), HeroArts (Designer Butterflies)
Flowers: Prima
Spray mist: Glimmer Mist by Tattered Angels (Meadow Green)
Inkpads: Distress Inks by Tim Holtz, Staz-On (Olive Green)
Rhinestones: Kaisercraft
Pearls: Kaisercraft
Buttons: Doodlebug Design, SazzyNSuch
Brads: Momoyo
Handwriting: In-house

Sunday, May 1, 2011

Slow Mojo..

Happy Worker's Day! It's 1 am and it's a Worker's Day today and that means a public holiday on Monday! Yipee!! Though the weekend is long, I have yet to start on my scrapping works. I have been busy concentrating on housekeeping and that makes my mojo seems to slither. I am happy though now that I have Martha Stewart's doily lace edge punch and its ribbon loop punch around the page. I have also Ek Success edge punch - open scallop to add into my collection. It's quite expensive but I know that the purchase was well worth it. I will definitely show you my works using these punches in the next post. 

I need my mojo back!!

Ciao!

LinkWithin

Related Posts Plugin for WordPress, Blogger...